Running Digital Micrograph on Linux or Mac OSX
January, 2012
This article originally appeared in Microscopy TodayIntroduction Digital Micrograph (DM), the core software of Gatan’s Microscopy suite, is considered an industry standard among microscopists. The offline DM application is freely available from Gatan [1]. Unfortunately, DM software has been designed to run only on Microsoft Windows operating systems, thus distancing the microscopy community from popular Unix based systems such as Linux or Mac OSX. An ad hoc solution to this problem has required a virtualized Windows operating system running on top of the users native operating system. This is not only slow, having to emulate each processor instruction, but also requires installation and licensing of Windows and the virtualization software. However, with the aid of open source resources, it is possible to run DM natively on Linux and Mac OSX (Figure 1). This article was written as a guide with easy- to-follow installation instructions to liberate users from the Windows emulation pidgeonhole and enable them to freely analyze data on Unix based systems.
Running Digital Micrograph (32-bit) on Linux and Mac OSX is accomplished with the use of Wine, an open source application that allows Unix-like operating systems to execute programs written for Microsoft Windows. Wine provides a compatibility layer that allows Windows system calls to be run on a substitute operating system. As stated by internal Wine admins, “You can start your Windows application straight from your regular desktop environment, place that application's window side by side with native applications, copy/paste from one to the other, and run it all at full speed” [2]. After installing Wine and the necessary Microsoft components, DM runs readily on Linux or OSX. The software has been tested using the offline DM V2.01 demo provided by Gatan. The steps for a Linux system are nearly identical and simpler than OSX, so the remainder of this guide is addressed to Mac users. The main discrepancy between getting DM to run on OSX and Linux is the repository software used. MacPorts is used in place of the appropriate Linux equivalent (e.g. apt-get). Also, there is an implicit assumption that Linux users are avid computing enthusiasts and merely require skimming this guide.
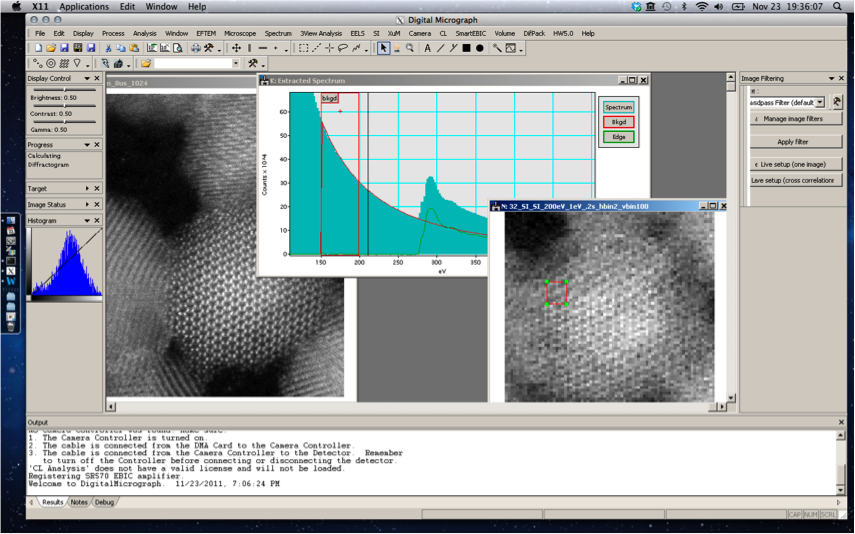 Figure1: Screenshot showing Digital Micrograph 2.01.694.0 on Mac OSX Lion (10.7.2)
How To Run Digital Micrograph on Mac OSX
1. Install Xcode on MacOSX
Apple’s Xcode developer tools are needed to proceed with installing the subsequent software in this guide. If not currently installed, Xcode is readily acquired with a few clicks from the ‘App Store’ built into Mac OSX or via the ‘Apple Developer Connection’ website (connect.apple.com). The download will take awhile and upon completion, the software requires installation. If obtained through the ‘App Store,’ the installation will begin upon running Xcode for the first time.
To obtain MacPorts, visit the download section at www.macports.org. Download the package (dmg) installer for either Lion or Snow Leopard. Mount the downloaded file, execute the installation by double-clicking the icon, and then follow the instructions on the screen.
After completing the installation, open the OSX terminal found under ‘Utilities’ in the Applications directory. With the terminal open, ensure that MacPorts is installed by entering: $man port If installed correctly, the users guide to running port will become visible. Press ‘q’ to return to the command prompt.
Next, update port by entering:
$sudo port –v selfupdate
After the software checks for updates, a prompt to confirm the update process may appear. If so, follow the directions on the screen, otherwise, proceed with installing Wine.
3. Install Wine MacPorts enables access to a large repository of useful software, specifically Wine. It is easily installed with one line of commands (Figure 2):
$sudo port install wine
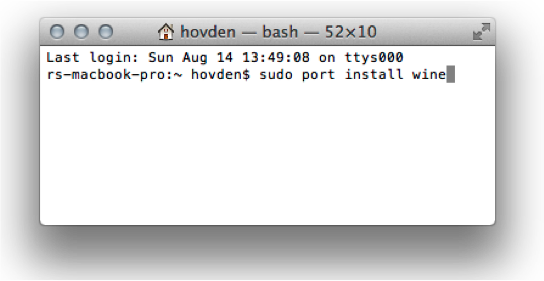
If prompted, confirm the installation. Once the installation has started, it takes a long time, as it acquires all the dependencies that Wine needs to run. On the upside, this process provides many software tools familiar to Linux users. At this point, Mac users can explore running any Windows application.
4. Install WineTricks Several windows components—.dll’s and fonts—are not included with Wine. The software package, WineTricks, makes acquiring these components easy. WineTricks requires first getting two tools, wget and cabextractor. Wget allows files to be directly pulled off the Internet from the command line. Cabextractor is a tool needed to extract Microsoft cabinet files (.cab). Using port, installation is easy:
$sudo port install wget cabextract
At this point Winetricks is retrievable at www.kegel.com/wine/winetricks. It can be installed simply from the command line using:
$wget www.kegel.com/wine/winetricks
This downloads Winetricks [4] to the current working directory. It can then be used to install some core fonts as well as Visual C and Basic components:
$sh winetricks corefonts vcrun6 vb6run vcrun2003 vcrun2008 wsh57
These components are sufficient for running DM v2.01, but more can be installed as necessary. Newer versions may require returning to Winetricks. During the installation, read and accept any user agreements if asked. Once finalized, all the software needed to install Digital Micrograph is ready.
5. Installing New Versions of Digital Micrograph Installation of DM is much like that of windows. If a copy of DM is not already available, an offline demo copy of DM can be acquired [1]. In the terminal, locate the directory containing the Gatan license installer (e.g. $cd YourDirectoryLocation) and run the license installer:
$wine LicenseInstaller.exe
Next, run the DM installer, and follow the directions in the same manner typical to a Windows install:
$wine Setup.exe
Gatan DM should now be installed. Errors may occur when attempting to install unlicensed packages. However, DM should still run on your machine. Installation of older versions may not work—requiring additional steps not detailed here.
6. Running Digital Micrograph At this point, DM can run on your Mac. With the terminal open, navigate to the location of your Digital Micrograph directory. For example, if DM installed in the Gatan directory of the home folder, use: $cd ~/Gatan/DigitalMicrograph
Now run DM under wine:
$wine DigitalMicrograph.exe
7. Add a desktop shortcut Finally, adding a shortcut icon to the desktop or taskbar allows DM to launch with a single click. Open the AppleScript Editor from the Applications/Utilities directory. Then, paste the following:
tell application "Terminal" activate do script "cd ~/Gatan/DigitalMicrograph; wine DigitalMicrograph.exe" end tell
Be sure to change the directory path (i.e. ~/Gatan/DigitalMicrograph) to match the location of the copy of Digital Micrograph. Check that the script is running properly by pressing the play button from within the AppleScript Editor. To save the application, go to ‘File > Save As’ and choose ‘Application’ from the File Format dropdown menu. Then choose save. This newly created application to automatically launch DM from within the Mac OS can be executed with a single double-click. If inclined, change the Applications icon image and then add it to your Dock.
The Quick Summary (1) Install Xcode from Apple ‘Apps Store’ (2) Obtain MacPorts via their website (3) Install Wine using MacPorts (4) Acquire and Run WineTricks (5) Install Digital Micrograph using Wine (6) Run DigitalMicrograph using Wine.
Discussion This guide demonstrates a quick method to run Digital Micrograph on OSX or Linux system (Figures 1 and 3). Running the software under Wine has only been tested in a limited offline mode and therefore is only recommended for data processing and analysis. Before concluding, microscopists should bear in mind open source alternatives for image and data analysis that are cross-platform compatible. ImageJ [5] and its many plugins can provide many solutions to processing microscope images. For EELS analysis, EELSmodel [6] and the Cornell Spectrum Imager (CSI) [7] are recommended. This article was written to encourage the microscopy community to explore other operating systems for the development of microscopy tools.
Acknowledgements I would like to acknowledge David Muller, Yingchao Yu, Megan Holtz, Julia Mundy, Huolin Xin, Pinshane Huang, and Kara Church for providing testing and feedback. Thanks also to Gatan for helpful discussions.
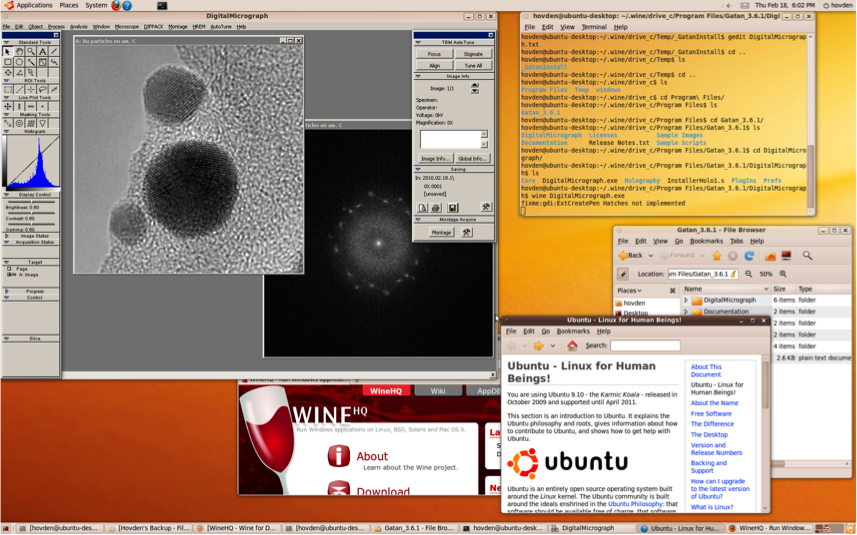 Figure3: Screenshot showing Digital Micrograph 3.6.1 demo running on Linux (Ubuntu 9.10)
References
[1] Digital Micrograph Demo: www.gatan.com/resources/scripting/demo/
[2] Wine: www.winehq.org/
[3] MacPorts: www.macports.org/
[4] Winetricks: code.google.com/p/winetricks/
[5] ImageJ: rsbweb.nih.gov/ij/
[6] EELSModel: www.eelsmodel.ua.ac.be/
[7] Cornell Spectrum Imager: code.google.com/p/cornell-spectrum-imager